Welcome to the world of Lil Sew n Sew! This manual is your guide to understanding and using your new mini sewing machine. It provides essential information for setup, operation, and maintenance of your device. This manual is designed to help you start sewing with ease.
Overview of Lil Sew n Sew Mini Sewing Machines
Lil Sew n Sew mini sewing machines are designed for basic sewing needs, offering a portable and convenient option for small projects. These compact machines are perfect for beginners and those with limited space, featuring user-friendly designs that simplify the sewing process. Many models come with essential functions like adjustable speeds, reverse sewing, and built-in stitch patterns. Powered by either a power adapter or batteries, these machines offer flexibility in use. They are ideal for quick repairs, simple crafts, and learning the basics of sewing. The machines are often manufactured by Tivax and MiTraveler, and sold under various brand names. The Lil Sew n Sew brand is known for its accessibility and ease of use.
Key Features of Lil Sew n Sew Machines
Lil Sew n Sew machines boast several key features that make them popular for home use. These mini sewing machines often include multiple stitch patterns, allowing for versatility in sewing. They typically offer dual-speed control, enabling users to adjust the machine’s pace according to their experience level and project needs. A reverse sewing function is a standard addition, securing seams and preventing unraveling. The free arm feature is another notable aspect, simplifying the sewing of cylindrical items like cuffs and sleeves. Many models also incorporate an automatic bobbin winder, making setup convenient and quick. Compact and lightweight, these machines are designed for easy storage and portability. The user-friendly controls make these sewing machines great for beginners.
Setting Up Your Lil Sew n Sew Machine
Before you begin sewing, it’s crucial to set up your machine correctly. This section will guide you through the initial steps, including placement, power connection, and bobbin setup.
Step-by-Step Setup Guide
Begin by placing your Lil Sew n Sew machine on a stable, flat surface with adequate lighting and workspace. Ensure the power switch is in the OFF position. Next, connect the power adapter to the machine and a suitable outlet. Carefully insert a pre-wound bobbin into the bobbin case located beneath the machine. Refer to the included diagrams in your instruction manual for correct orientation. For threading, turn the hand wheel counter-clockwise until the needle is at its highest point. Follow the numbered guides on the machine for proper thread path. Finally, double-check all connections before you turn on the machine. If using batteries, insert 4 AA batteries into the compartment.
Proper Placement and Workspace
Selecting the right location for your Lil Sew n Sew machine is crucial for efficient and comfortable sewing. Choose a sturdy, flat surface like a table or desk to ensure the machine remains stable during operation. Good lighting is essential to prevent eye strain and to clearly see your work. Ensure you have enough space around the machine to move fabric freely and access all parts of the machine comfortably. Keep your workspace clear of clutter to avoid accidents and ensure a smooth sewing experience. Consider using a dedicated sewing area if possible. Having everything at hand will enhance your project and prevent frustration.

Understanding the Lil Sew n Sew Manual
This section guides you through the Lil Sew n Sew manual. Learn how to effectively use the manual to understand your machine. It helps to identify all parts and accessories.
Navigating the Instruction Manual
The Lil Sew n Sew instruction manual is designed to be your primary resource. Begin by familiarizing yourself with the table of contents to quickly locate specific sections. Pay close attention to diagrams and illustrations, which provide visual guidance for machine setup and operation. Each section will provide detailed instructions for various aspects of your sewing machine, like threading and troubleshooting. The manual will walk you through the process of setting up, operating, and maintaining your Lil Sew n Sew machine. Use the index at the back of the manual for quick reference to specific terms or procedures. Make note of any safety warnings or precautions to ensure safe operation of the machine.
Identifying Machine Parts and Accessories
Understanding the different parts of your Lil Sew n Sew machine is crucial for its proper use. The main components include the thread spindle, take-up lever, hand wheel, needle clamp, and bobbin winder. You’ll also need to identify the bobbin compartment, tension screw, and on/off switch. Accessories typically include the power adapter, foot pedal, extra needles, and bobbins. Familiarize yourself with each part and its function using the diagrams within the manual. Knowing the function of each part will help you with threading, sewing, and any troubleshooting. Become acquainted with the accessories for easy replacement and for the proper functioning of the machine. Make sure you know how to correctly place each accessory.
Operating Your Lil Sew n Sew Machine
This section covers the essential steps for using your Lil Sew n Sew. Learn how to thread the machine, wind the bobbin, and execute basic sewing techniques.
Threading the Machine and Bobbin
Before you begin sewing, it’s crucial to correctly thread your Lil Sew n Sew machine. Start by placing the thread spool on the thread spindle. Then, guide the thread through the designated thread guides, following the numbered path on your machine, usually from 1 to 6. Ensure the power switch is off and the needle is in the highest position. Next, thread the needle from left to right. For the bobbin, wind it using the bobbin winder, following the instructions for your specific model, then insert the wound bobbin into the bobbin case, making sure it sits correctly. This precise threading is essential for a smooth sewing experience.
Basic Sewing Techniques
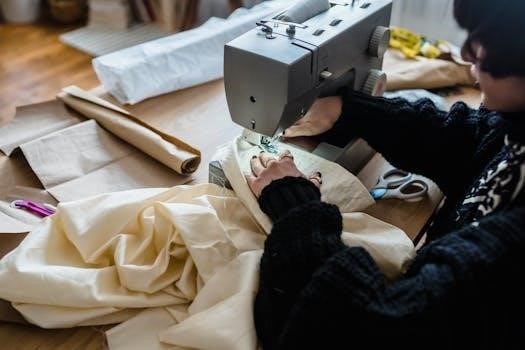
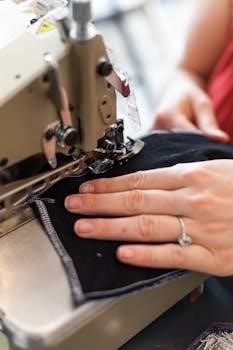
Once your Lil Sew n Sew machine is correctly threaded, you’re ready to begin basic sewing. Start by placing your fabric under the presser foot, ensuring it aligns with the needle. Lower the presser foot to secure the fabric. Begin sewing slowly, gently guiding the fabric along the guide to ensure straight stitches. To secure your stitching, sew a few reverse stitches at the beginning and end of your seam. Maintain a consistent speed and gently guide your fabric; avoid pulling it. Practice on scrap fabric to develop a good feel for your machine’s speed and capabilities.

Troubleshooting Common Issues
This section addresses common problems with your Lil Sew n Sew. We’ll cover issues like bobbin malfunctions and threading problems. Proper maintenance is key to prevent future issues.
Addressing Bobbin Problems
Bobbin issues are a common concern with mini sewing machines. If the bobbin case becomes loose, it might move within the machine or pop out. Re-aligning the bobbin, ensuring it’s in the correct position, can remedy this. Make sure the bobbin is properly wound and placed in the bobbin case. Check for any thread tangles. If the bobbin thread is not feeding correctly, it can cause a variety of problems. Ensure that the bobbin is wound evenly. A poorly wound bobbin can cause uneven stitches or thread jams. Be sure to follow the threading diagram in the manual.
Resolving Threading Issues
Proper threading is crucial for smooth sewing. Before you begin, always ensure that the power switch is in the “OFF” position. Turn the hand wheel until the needle is at its highest point. Follow the threading guides, usually marked with numbers on the machine. The needle should be threaded from left to right. If you experience issues, double-check that the thread is correctly passing through all guides, the tension disks, and the take-up lever. A needle threaded incorrectly can cause the machine to jam. Replace the needle if it is bent or broken.
Specific Lil Sew n Sew Models
This section details specific Lil Sew n Sew models, including the LSS-202, LSS-338, and LSS-505. Each model has unique features detailed in the following sub-sections.
LSS-202 Model Details
The Lil Sew n Sew LSS-202 is a compact mini sewing machine, perfect for beginners and small projects. It’s designed for basic sewing tasks. This model is known for its simplicity and ease of use. The LSS-202 features a straightforward design, making it easy to learn the fundamentals of sewing. Its small size makes it highly portable and suitable for limited spaces. The manual for the LSS-202 can be found online and is available in English. The bobbin case can sometimes become loose, but can be easily fixed by realigning it. This model is often sold as the LSS-202 Combo.
LSS-338 Model Details
The Lil Sew n Sew LSS-338 is another popular model, also designed for basic sewing tasks. This mini sewing machine is known for its compact design and user-friendly features. The LSS-338 comes with a detailed instruction manual, available as a PDF download. This model is similar to other Lil Sew n Sew machines in terms of its simplicity. The LSS-338 manual provides essential information for using the machine effectively. The manual includes diagrams and step-by-step guides to help users get started. The machine is often used for small projects. It is perfect for beginners due to its ease of use.
LSS-505 Model Details
The Lil Sew n Sew LSS-505 is a versatile mini sewing machine designed for various basic sewing needs. This model features 12 built-in stitch patterns, offering more flexibility than some other models; The LSS-505 is also known for its portability, as it can be powered by a 6V adapter or 4 AA batteries. It includes features like reverse sewing, sleeve sewing, and two-speed settings. An automatic bobbin winder makes setup convenient. The LSS-505 comes with its own user manual, available in English and Spanish. There is also a short video guide. This model is suitable for simple projects and beginners.